![]()
![]()
![]()
![]()
What is a Template?
After you have chosen the picture you want to load, you will be asked to define the characteristics of the "secondary work template" you want to make:
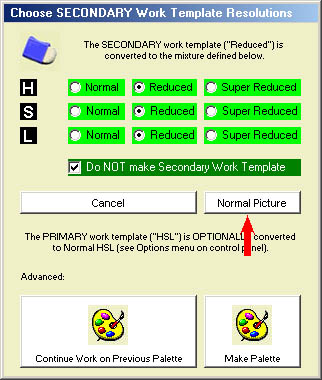
If this is your first attempt at using RD-D, then just click on "Normal Picture".
However, if you have had a little experience with RD-D, then you are ready to learn about the use of the secondary work template.
A secondary work template is nothing more than a 2nd copy of your picture, but with the number of colours in it drastically reduced. More will be said about this later, and you can experiment with different kinds of colour reduction by juggling with the light green options at the top of the following window. For now, we'll begin by just making one. Deselect the option in the dark-green check box by clicking on it:
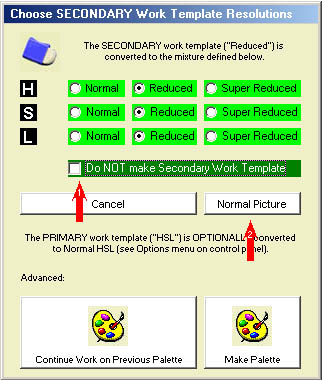
By this, you will be creating a default secondary template (a picture) which you will be able to see by clicking on the "Reduced" option of the RD-D control panel when it appears. You can then work on the secondary template (rubbing, to substitute selected pixels) instead of the primary template:
![]()
The PRIMARY work template will be created automatically, and in this case will correspond to the RGB picture you chose to load. You can always see this picture by clicking on the "RGB" option on the left of the "Reduced" option shown above. In this case, there has been no transformation of the original picture. If you want an HSL primary work template (which means that the original 16-million colour RGB picture is converted into a 3½ million colour HSL picture), then you need to select one of the options as follows in the options menu of the RD-D control panel:
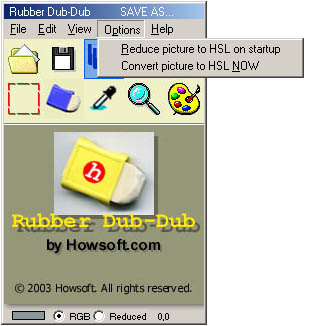
The PRIMARY work template is either created automatically at startup (if you have the option selected), or, as you can see from the menu, it can be done ad hoc, if or when you think you need it.
So after loading your input picture, there are two work templates at your disposal:
1) the PRIMARY template which may or may not have been reduced from RGB to HSL colour format according to your use of the control panel "Options" menu
2) the SECONDARY template which is a more drastic reduction of the number of colours used in the picture according to the options chosen in the "Choose SECONDARY Work Template Resolutions" panel shown at the top of this page.
N.B. When later you save your picture, it will normally (but not necessarily) correspond to the image of the PRIMARY template. This may or may not have been converted to HSL. If it has, then you can signal this by giving it the extension ".HSL" instead of ".BMP" so that you know it has been reduced. In this case, the RD-D software will not attempt to convert it again if it is loaded on a future occasion.
If you load an HSL picture, or convert an RGB picture to HSL, the option name changes at the bottom of the control panel:
![]()
So what are the templates used for?
Here is a brief description of why templates are sometimes necessary.
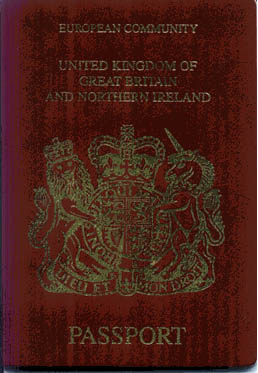
Let's begin with a rather dramatic picture of my passport:
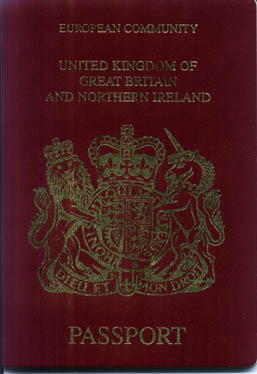
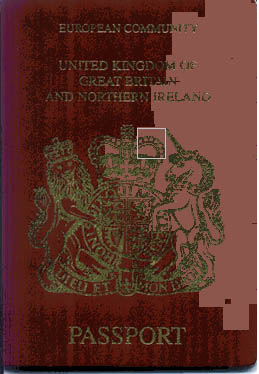
Perhaps a better scanner would produce a better result, but the only picture I have at the moment is absolutely horrible! And because I am preparing an advertisement to be included in an international magazine first thing on Monday morning, what do I do? Well, I use a Rubber Dub-Dub template, of course. So here is the result of making a secondary work template with an appropriate mixture of "Reduced" and "Super Reduced" options selected:
Not much better, you might think (if not worse). But "better" is in the eyes of the beholder! The vast difference between the 1st picture and the 2nd is that very few colours are used in the 2nd, and can therefore be substituted with great facility. Naturally, this will destroy the original appearance of the passport, but this is our aim anyway. I don't want a "real" passport in my advertisement. So we start our substitution work with the rubber:
Wow! That's like magic! It didn't take long, because most of the background pixels in the reduced template had been reduced to the same red colour value (8 in fact). After a quick rub and the tidying up of a few details, this is the passport I produced:
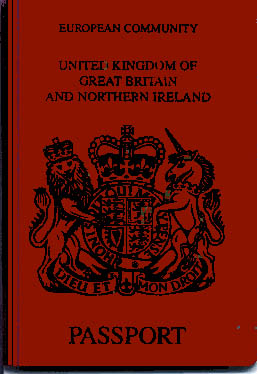
Good as new! Of course, what an "appropriate" reduction colour mixture for the template is, is a matter of experience and experiment. However, the passport above was done with the default "Reduced" options for H, S and L, and in fact these are often sufficient.
So the message is this. The RD-D secondary work template is most useful for pictures which permit re-constitution of their colours, and where a "real" appearance is neither necessary nor desirable. It is useful for diagrams, magazine illustrations, pamphlets, maps, cartoons, etc. etc.