![]()
![]()
![]()
![]()
Tool Displays - General
If you click on the control panel tool buttons for marquee, cutout or rubber, the upper part of the display will always be the same:
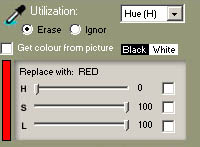
The upper part is concerned with the dropper utilization.
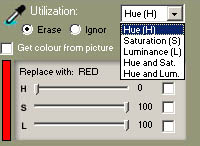
If the "Erase" option is chosen and you select "Hue (H)", then the pixels to be replaced are all those in the defined H dropper range. If you select "Saturation (S)", then the pixels to be replaced are all those in the defined S dropper range. If you select "Luminance (L)", then the pixels to be replaced are all those in the defined L dropper range. If you select "Hue and Sat." then the pixels to be replaced are all those whose Hue (H) falls within the defined H dropper range AND whose Saturation (S) falls withing the defined S dropper range. If you select "Hue and Lum." then the pixels to be replaced are all those whose Hue (H) falls within the defined H dropper range AND whose Luminance (L) falls within the defined L dropper range.
If the "Ignor" option is chosen, then what happens is an exact parallel of the above, except that the dropper ranges are to be ignored, i.e. the pixels to be replaced are all those which do NOT fall within the defined ranges.
The rest is concerned with the replacement colour. You can adjust the slides as you wish to get the replacement colour which will be shown in the thin, vertical, oblong box on the left. (If you drag the slides with the mouse, do remember that if you cannot get exactly the values you want by dragging, then you can adjust them by using the left and right arrow keys on your keyboard.) Or you can get the colour from the picture itself. Just select this option by selecting the check box (which will become ticked). Then click on the colour you want in the picture. The slides will be adjusted automatically and the colour will be shown in the box on the left. However, this disables the tool. To enable it again, click on the check box once more to remove the tick. If you want to replace with black or white, then just click on the words.
Important
Only the selected components of the replacement colour will be used. So for example, regardless of the values shown by the 3 sliders, if you have only H selected in the checkbox on the right of the slider, only the H component will be replaced in the original pixels. To further exemplify this, suppose we have 3 pixels to replace:-
(33, 76, 91) (38, 55, 89) (31, 84, 90)
- and you have specified a replacement hue of 60, then the 3 pixels will end up as:
(60, 76, 91) (60, 55, 89) (60, 84, 90).
But consider the same 3 original pixels when you have specified a replacement luminance of 95. They would end up as:
(33, 76, 95) (38, 55, 95) (31, 84, 95).
You may sometimes want to use the replacement parameters in combination. In actual practice, most of the time, you will use hue alone as the specified dropper range for replacement, and also use hue alone as a replacement value using one of the tools. But of course, this depends entirely on the picture involved and what you want to do with it.
Related Topics: